19 Feb 2011

Food!

We have eaten in Michelin star restaurants all over the world, but before going to Hong Kong we made an executive decision not to seek out HK Michelin eateries, but to stick to the 'local' places where the Hong Kongers eat!

After getting our systems in sync with the local time, we were ready.

What for?

 Ready for dumplings!

We walked to "Central" and it was mid afternoon. We walked along Wellington Street and we looked for somewhere which looked local, and sold dumplings.

We thought this place looked quite good...


It was surrounded by loads of other little similar looking places, but for us the winning formula was the menu pinned to the window...


Many dumplings (and noodles and rice too!) but we went for the dumplings. I don't know if you have had pot sticker dumplings before but that is what they were like - looks like they've been steamed or boiled and then dropped into a pan and fried until they have a nice brown crust.


Whilst we were there, the family were making them on a little table beside the kitchen. I was watching closely and trying to get pics but didn't want to offend them. We were the only ones in at that time of day.

The dumplings were so good that we decided to go for something else as well...


The nearby bowl was a roast chicken with rice and vegetables, the other one was a beef with rice and vegetables. Don't they look fresh and lovely? The sauce on the top was a soy/garlic/spring onion/chilli mix.

It was a really simple dish; boiled rice, with leeks and greens in it. Roasted meat (chicken or beef) laid on the top. Then sprinkled over with the killer sauce.

Totally wow!

Sod the Michelin - bring on the street food!!!

Here are all the other posts on our Hong Kong trip

18 Feb 2011

Hong Kong First Impressions

We landed on Monday afternoon, at 5pm - rush hour - after a relatively uneventful flight.

Dan had pre-booked us a combined ticket for the MTR (HK tube network) and airport return so having collected that, we jumped on the train to the city.

The immediate impressions were one of water, and islands. The train takes you from Lantau island, which is where the new airport is (no scary landings between skyscrapers for us, like you used to have to at the old airport!)


Viewed from the train are mind-boggling groups of apartments, clinging to the edges of the coastline. The tallest blocks of flats I have ever seen. Then 6 or 7 blocks together. All clustered on the edge of the water. I can't even begin to think how many flats there must be in each one!!!


Still, there was a lot of coastline untouched - I'd expected it to be much more populated. Seemed like the population was corralled into the clusters of blocks of flats...leaving the rest of the land to the jungle!

We arrived into a station called Hong Kong (if you were in any doubt!) and we had to change here to 'Central' - we had just arrived and started looking round to get our bearings for maybe 10 or 15 seconds, and then someone came up and offered us help. They explained that we had to walk down a long tunnel in order to get to Central.

This actually became a theme of our trip; as soon as we stopped to look around/find our way, someone would come up to us and offer help! Initially we were wary - what where they after - were they the 'decoy' for some form of pick-pocket gang? Errrm, no, actually they were just offering help! This was Chinese and European people alike. It was so refreshing that in the mega hustle and bustle of this hectic city - people still had the small town attitude of wanting to help a stranger. Isn't that nice?

When we came out of the tube station - we had a 5 minute walk to the hotel - I'd studied the route on google maps so I "knew" the way. It was getting on for 6pm and the streets were in total mad rush hour. It was mental (and exciting!). Thousands of people on the streets. Millions of smells from lots and lots of small restaurants.


It was all so fab....and foreign.

We were in Hong Kong!

Here are all the other posts on our Hong Kong trip

Hong Kong Photo Albums

There are alot - and more to come - feel free to have a nosey. Please forgive the multiple pics of the same thing over and over - Dan's new camera experimentations!


https://picasaweb.google.com/aldridge.dan/HongKong01#


https://picasaweb.google.com/aldridge.dan/HongKong02#


https://picasaweb.google.com/aldridge.dan/HongKong03#

New albums added 20/02/2011

https://picasaweb.google.com/aldridge.dan/HongKong04#


https://picasaweb.google.com/aldridge.dan/HongKong05#


https://picasaweb.google.com/aldridge.dan/HongKong06#

Li & Dan xxx

The Big Buddha

So today we hoiked ourselves to the end of the MTR line "Tung Chung" off to meet the BIG Buddha. He is absolutely MASSIVE, and lovely, actually. He lives in the Ngong Ping village, where there is also a monastery and, a whole load of tourist shops(!!!)

To get to the village, there is an epic 4km cable car ride which sweeps you up from the ground and into the mountains where the Buddha sits. You get an amazing vew of the airport at Lantau as the 1st part of the journey takes you alongside the runway. However the car soon sweeps you up into the mountains and gives you more and more impressive views, until you eventually see the Buddha himself.

Within the monastery we ate a snack at one of the many cafe/restaurants - lovely veggie food which they make and sell. Super cheap too!


Here are all the other posts on our Hong Kong trip

1st full day

Ok so with the time difference, the jet lag, and general confusion, I'm still not sure what day it is!!!

Today, I think, is Wednesday, and we've been out for a full day's wanderings around the local environs.

I've been wearing my pedometer and the 16,500 steps add up to approximately 12k! Wow...I do like walking when on holiday...I never get anywhere near that many steps when at home.

Anyway, where have we been...


A little bit all over the place really - it's kind of what we do when we're in a place for the 1st time. Walk - see something interesting, walk - see something else interesting...walk over that way. So it's meandering and circuitous, but starts to give you a feel of the place.

Dan has already been Mr Happy Snappy with the new CanonEOS - 128 pics today, and counting. I'm going to be uploading them to picasa but in the meantime I will publish a few here...


Here are all the other posts on our Hong Kong trip

17 Feb 2011

Been Away

OK well it's not been too much of a secret that we have been away in the spectacular Hong Kong for 10 days.

We didn't really want the world, his wife, and everyone on FaceBook knowing our business - especially after 4 break-ins - so we just kept a bit of a low profile and only posted non location related info and neutral stuff.

Anyway, we're back - or at least, by the time this is posted...nearly home!

The next few posts will be with links to the piccys and our thoughts and happenings whilst we were away!

Click here too see all the posts on our Hong Kong trip

11 Jan 2011

Walking to Wakey

So, as part of our 'get fit in 2011' campaign, we're going to do a little walk to Wakefield - not really but on the treadmill! We're logging our miles on it and then I'm recording the distance on a RunningAhead log for each of us.

So...this is Liza's Walk to Wakey


And, this is Dan's Walk to Wakey


8 Jan 2011

Tutorial - Lined Drawstring "Fat Quarter" Pouch


I've made 3 or 4 of these as quick bags to put some of my recent prezzies in. They're a nice neat way of wrapping the gifts and are super quick and easy to make.

Materials:

1 fat quarter of fabric
2 x 20 inch pieces of cord or ribbon for the drawstring

This is the quick steps version (scroll down for the detailed version with loads of pictures below.
  1. Take the FQ material and fold it in half, right sides together, along the shorter side. I always iron and pin at this point then you have a lovely flat piece to work with.
  2. Stitch a 1/4 - 1/2 inch seam down the folded edge.
  3. Stitch another 1/4 - 1/2 inch seam down the opposite side to the folded edge, making a long tube. 
  4. Slit the folded seam. Press open both seams. 
  5. Stitch across the bottom of the piece, and then the same across the top - leaving a 3 inch gap in the top seam to turn the bag through. Press these seams open. 
  6. Snip a 1 inch square out of each corner  - pinch & sew a 1/4-1/2 inch seam across each corner to make the bag have a flat bottom. 
  7. Turn the bag the right way out thru the gap. Use a knitting needle or pen to push out the corners. Press.
  8. Treating the end with the slit as the "inside" and the other end as the "outside", push the inside of the bag inside the outside. 
  9. You have to jiggle the inner and outer around a bit until the inside is sitting flush with the outside. Once you're happy, press & pin.
  10. Top stitch about an inch from the top making sure you reinforce just as you go over the side seams on both sides. 
  11. Do the same another 3/4 to an inch below that, to make the channel for the cord - making sure the channel is wide enough for your piece of ribbon or cord. Reinforcing at the seams. 
  12. Using a seam ripper, slit the side seams carefully between the 2 rounds of top stitching, being careful not to go through the top stitching. 
  13. Thread the cord through the channel & tie - one on each side. 
  14. Finish off the gap in the lining - by hand or machine.
  15. And voila a bag!


Step 1
Take the FQ material and fold it in half, right sides together, along the shorter side. I always iron and pin at this point then you have a lovely flat piece to work with.
It doesn't really matter which way you fold - FQs are all slightly different but usually square-ish - the finished bag will be the size of the FQ folded into quarters minus the seams, so have a go and work out which way you want the finished bag to be. This first fold will determine the width of the finished bag. If you don't have a Fat Quarter, then use a piece of fabric of a similar size - this one was 20.5" x 21.5" - if you don't have that, then you can use 2 pieces the size of a FQ folded in half - say 10" or 11" x 21" or 22". Something like that! If you are using 2 pieces, then pin right sides together. 


Step 2
Stitch a 1/4 - 1/2 inch seam down the folded edge.
Seems weird to sew a fold, right? But, I'm lazy and it always seems easier to fold, sew and then split the seam, than to split the material into 2 bits which you then seam together. Of course, if you have a fabric which has an UP and DOWN direction, this is exactly what you *have* to do but lets not consider that for the moment!!!


Step 3
Stitch another 1/4 - 1/2 inch seam down the opposite side to the folded edge, making a long tube. 
I just happened to have stitched an 'O' on the front of this bag in the meantime so please don't think there's anything odd about it!!!

Step 4
Slit the folded seam. Press open both seams. 
Always press your seams - the bag lies much better when finished if you do this. 


Step 5
Stitch across the bottom of the piece, and then the same across the top - leaving a 3 inch gap to turn the bag through. Press these seams open. 
I use a sleeve board to press most of my bag seams - but, like in this case, if you can't fit a sleeve board in through the gap, then just jiggle the fabric round as best you can to get the seams open. Where the seams are stitched at the corners, just do your best - you'll see by the next step, the corners won't matter in a minute, anyway!

Step 6
Snip a 1 inch square out of each corner  - pinch & sew a 1/4-1/2 inch seam across each corner to make the bag have a flat bottom. 
This is probably the hardest concept and one which I struggled with until I'd made the 1st bag - this is the bit which gives your bag depth, and a flat bottom. There are 2 ways to do it...
  • (a) pinch the corners, sew, then cut          or
  • (b) cut the corners, then pinch and sew
I went for (b) this time. 

Use a ruler to measure a 1 inch square in each corner of the fabric - then cut out these squares - yes this is supposed to cut across your seams.


Don't worry, you'll be stitching them up again. 
Next, pick up one corner by pinching it as you see in the picture and make the the two seams line up. The action is very similar to those Origami fortune tellers you used to make at school...!


You should now get a straight line directly chopping off the corner! You can press and/or pin at this point if you want. I do! Make sure the seams match, and make sure they are pressed outwards and not bunched up. Should look neat and flat like this...


Stitch a 1/4 to 1/2 inch across this diagonal. Repeat for all 4 corners. 


Step 7
Turn the bag the right way out thru the gap. Use a knitting needle or pen to push out the corners. Press. 
It starts looking like a long, thin, pillowcase with puffy corners at this point. 


Step 8
Treating the end with the slit as the "inside" and the other end as the "outside", push the inside of the bag inside the outer piece. 
This is the bit where you realise you've made a bag with its own lining, all in one piece!


Grab the top end of the back and shove into the bottom end. Note the slit will end up inside. 

Nearly in...

Inside the bag view
Step 9
You have to jiggle the inner and outer around a bit until the inside is sitting flush with the outside. Once you're happy, press & pin.
I usually spend a good few minutes getting the bag to sit right. This is quite important as once you do the next step there's no going back!


First time I've done one with a pic on the front - note to self: next time move the motif a little higher!
Step 10
Top stitch about an inch from the top making sure you reinforce just as you go over the side seams on both sides. 
By reinforce I mean go back and forward over the seam, this is REALLY important or you might find the bag coming apart at some point. 
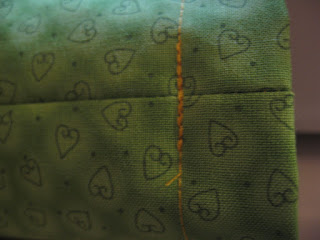

Reinforced over the seam
Once you have finished, a fab top tip I learned from FutureGirl's tutorial for creating a lining for a crochet bag which is, 
thread both sewing machine threads on a needle and pull to the back through the [fabric].  Tie them to the threads on the back side of the [material]
This makes a really fabulous finish for your top stitching. Do this before moving onto the next step.

Thread these threads onto a needle and then just stitch through to the inside!
Step 11
Do the same; another round of top stitching 3/4 to an inch below that, to make the channel for the cord - making sure the channel is wide enough for your piece of ribbon or cord. Reinforcing at the seams.
Don't forget to use FutureGirl's finishing tip as well here!

Step 12
Using a seam ripper, slit the side seams carefully between the 2 rounds of top stitching, being careful not to go through the top stitching. 
These 2 gaps will be where the cord or ribbon goes, and is why you *must* slit the fold in the material described in step 4. If you don't, one of the gaps will not be a gap, but a fold the depth of the seam!!! Not much use for threading your cord into.


Step 13
Thread the cord through the channel - one on each side. 
A safety pin is the key here! The cord needs to be approximately 2 x the width of the bag, plus enough to tie a knot. 


Step 14
Finish off the gap in the lining - by hand or machine.
I like to hand stitch the final gap inside the bag - many many blogs suggest you machine close the gap. Up to you! Pinch it shut, pin, and sew by whichever means you like!


Step 15
Voila - a bag. 

5 Jan 2011

Fame at last!

The fabulous TabbyCat Fabrics where I buy the majority of my materials have a Customer's Gallery where they publish things made with the fabric bought in the store.

Guess what?

I have THREE entries on their bags page!

Check it out ---> HERE

I am famous!!!

4 Jan 2011

A gift for Jacq

When I finished Auntie Bo's 1st bag way way back in March , I blogged about a website called 'Future Girl's Craft Blog' and her excellent tutorial on "How to create a lining for a crochet bag" - and the complimentary "How to sew in a lining you've made into a crochet bag" from which I have learned a LOT about how to do these things!!

I really liked the way she made quite complicated things seem simple, so when I saw that she'd designed a handbag called the Starling Handbag (with free pattern to download) and then had created some "Crochet-a-long" videos I thought I'd have a go.

It was a bit more complicated than the ones I had made up until that point which had basically consisted of just 2 bits of crochet whip-stitched together at the sides and a handle added on...


Even though they're cute...eh?

So anyway, back to the Starling bag - I had a go - I followed the Crochet-A-Long step by step - I struggled and struggled with the Foundation Single Crochet - a useful but b'stard hard divvil of a stitch, and I got there! 

I was inspired by some lovely stripy fabric in the Summer of Love fat quarter collection from the fabulous TabbyCat Fabric and so this is what the result looked like...


Some of the inner lining which inspired the outside...


The other pics of the bag are here on my Picasa web albums

Quite a few people have made the Starling bag and they send pictures to Alice (Futuregirl).

She puts them in a flikr pool called Futuregirl Starling Handbags Pool - Check it out. It's amazing that with 1 pattern, so many different designs can be made..!