
I've made 3 or 4 of these as quick bags to put some of my recent prezzies in. They're a nice neat way of wrapping the gifts and are super quick and easy to make.
Materials:
1 fat quarter of fabric
2 x 20 inch pieces of cord or ribbon for the drawstring
This is the quick steps version (scroll down for the detailed version with loads of pictures below.
- Take the FQ material and fold it in half, right sides together, along the shorter side. I always iron and pin at this point then you have a lovely flat piece to work with.
- Stitch a 1/4 - 1/2 inch seam down the folded edge.
- Stitch another 1/4 - 1/2 inch seam down the opposite side to the folded edge, making a long tube.
- Slit the folded seam. Press open both seams.
- Stitch across the bottom of the piece, and then the same across the top - leaving a 3 inch gap in the top seam to turn the bag through. Press these seams open.
- Snip a 1 inch square out of each corner - pinch & sew a 1/4-1/2 inch seam across each corner to make the bag have a flat bottom.
- Turn the bag the right way out thru the gap. Use a knitting needle or pen to push out the corners. Press.
- Treating the end with the slit as the "inside" and the other end as the "outside", push the inside of the bag inside the outside.
- You have to jiggle the inner and outer around a bit until the inside is sitting flush with the outside. Once you're happy, press & pin.
- Top stitch about an inch from the top making sure you reinforce just as you go over the side seams on both sides.
- Do the same another 3/4 to an inch below that, to make the channel for the cord - making sure the channel is wide enough for your piece of ribbon or cord. Reinforcing at the seams.
- Using a seam ripper, slit the side seams carefully between the 2 rounds of top stitching, being careful not to go through the top stitching.
- Thread the cord through the channel & tie - one on each side.
- Finish off the gap in the lining - by hand or machine.
- And voila a bag!
Step 1
Take the FQ material and fold it in half, right sides together, along the shorter side. I always iron and pin at this point then you have a lovely flat piece to work with.
It doesn't really matter which way you fold - FQs are all slightly different but usually square-ish - the finished bag will be the size of the FQ folded into quarters minus the seams, so have a go and work out which way you want the finished bag to be. This first fold will determine the width of the finished bag. If you don't have a Fat Quarter, then use a piece of fabric of a similar size - this one was 20.5" x 21.5" - if you don't have that, then you can use 2 pieces the size of a FQ folded in half - say 10" or 11" x 21" or 22". Something like that! If you are using 2 pieces, then pin right sides together.

Step 2
Stitch a 1/4 - 1/2 inch seam down the folded edge.
Seems weird to sew a fold, right? But, I'm lazy and it always seems easier to fold, sew and then split the seam, than to split the material into 2 bits which you then seam together. Of course, if you have a fabric which has an UP and DOWN direction, this is exactly what you *have* to do but lets not consider that for the moment!!!

Step 3
Stitch another 1/4 - 1/2 inch seam down the opposite side to the folded edge, making a long tube.
I just happened to have stitched an 'O' on the front of this bag in the meantime so please don't think there's anything odd about it!!!

Step 4
Slit the folded seam. Press open both seams.
Always press your seams - the bag lies much better when finished if you do this.
 Step 5

Stitch across the bottom of the piece, and then the same across the top - leaving a 3 inch gap to turn the bag through. Press these seams open.
I use a sleeve board to press most of my bag seams - but, like in this case, if you can't fit a sleeve board in through the gap, then just jiggle the fabric round as best you can to get the seams open. Where the seams are stitched at the corners, just do your best - you'll see by the next step, the corners won't matter in a minute, anyway!

Step 6
Snip a 1 inch square out of each corner - pinch & sew a 1/4-1/2 inch seam across each corner to make the bag have a flat bottom.
This is probably the hardest concept and one which I struggled with until I'd made the 1st bag - this is the bit which gives your bag depth, and a flat bottom. There are 2 ways to do it...
- (a) pinch the corners, sew, then cut or
- (b) cut the corners, then pinch and sew
Use a ruler to measure a 1 inch square in each corner of the fabric - then cut out these squares - yes this is supposed to cut across your seams.


Don't worry, you'll be stitching them up again.
Next, pick up one corner by pinching it as you see in the picture and make the the two seams line up. The action is very similar to those Origami fortune tellers you used to make at school...!


You should now get a straight line directly chopping off the corner! You can press and/or pin at this point if you want. I do! Make sure the seams match, and make sure they are pressed outwards and not bunched up. Should look neat and flat like this...

Stitch a 1/4 to 1/2 inch across this diagonal. Repeat for all 4 corners.


Step 7
Turn the bag the right way out thru the gap. Use a knitting needle or pen to push out the corners. Press.
It starts looking like a long, thin, pillowcase with puffy corners at this point.


Step 8
Treating the end with the slit as the "inside" and the other end as the "outside", push the inside of the bag inside the outer piece.
This is the bit where you realise you've made a bag with its own lining, all in one piece!
Step 9
 |
| Grab the top end of the back and shove into the bottom end. Note the slit will end up inside. |
 |
| Nearly in... |
 |
| Inside the bag view |
You have to jiggle the inner and outer around a bit until the inside is sitting flush with the outside. Once you're happy, press & pin.
I usually spend a good few minutes getting the bag to sit right. This is quite important as once you do the next step there's no going back!
Step 10
 |
| First time I've done one with a pic on the front - note to self: next time move the motif a little higher! |
Top stitch about an inch from the top making sure you reinforce just as you go over the side seams on both sides.
By reinforce I mean go back and forward over the seam, this is REALLY important or you might find the bag coming apart at some point.  |
| Reinforced over the seam |
Once you have finished, a fab top tip I learned from FutureGirl's tutorial for creating a lining for a crochet bag which is,
thread both sewing machine threads on a needle and pull to the back through the [fabric]. Tie them to the threads on the back side of the [material]
This makes a really fabulous finish for your top stitching. Do this before moving onto the next step.
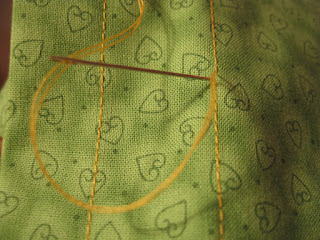
 |
| Thread these threads onto a needle and then just stitch through to the inside! |

Step 11
Do the same; another round of top stitching 3/4 to an inch below that, to make the channel for the cord - making sure the channel is wide enough for your piece of ribbon or cord. Reinforcing at the seams.
Don't forget to use FutureGirl's finishing tip as well here!

Using a seam ripper, slit the side seams carefully between the 2 rounds of top stitching, being careful not to go through the top stitching.
These 2 gaps will be where the cord or ribbon goes, and is why you *must* slit the fold in the material described in step 4. If you don't, one of the gaps will not be a gap, but a fold the depth of the seam!!! Not much use for threading your cord into.

Thread the cord through the channel - one on each side.
A safety pin is the key here! The cord needs to be approximately 2 x the width of the bag, plus enough to tie a knot.


Step 14
Finish off the gap in the lining - by hand or machine.
I like to hand stitch the final gap inside the bag - many many blogs suggest you machine close the gap. Up to you! Pinch it shut, pin, and sew by whichever means you like!


Step 15
Voila - a bag.


You should go into teaching!! Fab instructions and lovely bag, love Luce x
ReplyDeleteReally clear instructions, thanks Liza. Love this. Em x
ReplyDelete